
Note: The language used in this pattern has been radically updated from the original.
Materials
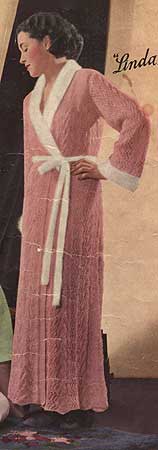
7 Balls (2 ozs each) BEEHIVE “SILVERSHEEN,” and 4 Balls (1/2 oz each) “FUZZY WUZZY” Angora – the original was worked with: “Silversheen,” Pink, and “Fuzzy Wuzzy,” White
Two No 6 (5mm), two No 7 (4.5mm) and two No 8 (4mm) “BEEHIVE” Knitting Needles (old UK sizes)
A No 9 “INOX” Crochet Hook
6 yds Japanese Silk
One Press Stud
Measurements
Length from top of shoulder 51 ins
Width all round at under-arm, 38 ins
Length of sleeve from under-arm, 18 ½ ins
Work at a tension to produce 1 pattern to 5 inches on No 6 Needles, 1 pattern to 4½ inches on No 7 Needles, 1 pattern to 4 inches on No 8 Needles
The Pattern
** 1st row: K1, * K3, (yo, K2tog) twice, yo, K1, yo, K2, K2tog, K4, K2tog, K2, (yo, SSK) three times, repeat from * to the last stitch, K1
2nd and alternate rows: K1, purl to the last stitch, K1
3rd row: K1, * K3, (yo, K2tog) twice, yo, K3, yo, (K2, K2tog) twice, K2, (yo, SSK) three times, repeat from * to the last stitch, K1
5th row: K1, * K3, (yo, K2tog) twice, yo, K5, yo, K2, (K2tog) twice, K2, (yo, SSK) three times, repeat from * to the last stitch, K1
7th row: K1, * K3, SSK, (yo, SSK) twice, yo, K2, K2tog, K4, K2tog, K2, yo, K1, (yo, K2tog) twice, yo, repeat from * to the last stitch, K1
9th row: K1, * K3, SSK, (yo, SSK) twice, yo, (K2, K2tog) twice, K2, yo, K3, (yo, K2tog) twice, yo, repeat from * to the last stitch, K1
11th row: K1, * K3, SSK, (yo, SSK) twice, yo, K2, (K2tog) twice, K2, yo, K5, (yo, K2tog) twice, yo, repeat from * to the last stitch, K1
12th row: Like the 2nd row**
The Right Front
Using the “Silversheen” and No 6 Needles, cast on 89 stitches
1st row: (K1, P1) five times, * K3, (yo, K2tog) twice, yo, K1, yo, K2, K2tog, K4, K2tog, K2, (yo, SSK) three times, repeat from * to the last stitch, K1
2nd row: K1, purl to the last 10 stitches, (P1, K1) five times (The edge stitch at the beginning of each pattern row, as given from ** to **, is omitted after the Moss Pattern border)
Work in pattern, keeping a border of 10 stitches in Moss Pattern at the centre edge until 11 patterns have been completed from the commencement
Using the No 7 Needles, repeat from ** to ** ten times
Using the No 8 Needles, continue working in pattern, decreasing once at the centre edge (inside the border) in the next and every following 4th row until 27 patterns have been worked from the commencement (71 stitches)
Proceed as follows:
1st row: K1, P1, * K2tog, P1, K1, P1, repeat from * to the last 4 stitches, K2tog, P1, K1 (57 stitches)
2nd row: Cast off 6 stitches, K1, * P1, K1, repeat from * to the end of the row
Continue working in Moss Pattern, decreasing one at the armhole edge in the next and every alternate row six times, whilst at the same time decreasing once in every 4th row at the front edge until 28 stitches remain
Work 9 rows in Moss Pattern without shaping
Shape for the shoulder as follows:
1st row: Work to the last 7 stitches, turn
2nd row: Work to the end of the row
3rd row: Work to the last 14 stitches, turn
4th row: Work to the end of the row
5th row: Work to the last 21 stitches, turn
6th row: Work to the end of the row
Cast off
The Left Front
Work exactly as given for the Right Front, but working the border and shapings at the opposite ends of the needle
The Back
Using the “Silversheen” and No 6 Needles, cast on 132 stitches
Repeat from ** to ** eleven times
Using the No 7 Needles, repeat from ** to ** ten times
Using the No 8 Needles, repeat from ** to ** six times
Proceed as follows:
1st row: K1, P1, * K2tog, P1, K1, P1, repeat from * to the last 5 stitches, K2tog, P1, K2tog (105 stitches)
2nd row: K1, * P1, K1, repeat from * to the end of the row
3rd row: Cast off 6 stitches, work in Moss Pattern to the end of the row
4th row: Cast off 6 stitches, work in Moss Pattern to the end of the row
Decrease once at each end of the needle in the next and every alternate row six times (81 stitches)
Continue working in Moss Pattern without shaping until the armholes measure the same as the front armholes
Shape for the shoulders as follows:
1st and 2nd rows: Work to the last 7 stitches, turn
3rd and 4th rows: Work to the last 14 stitches, turn
5th and 6th rows: Work to the last 21 stitches, turn
7th and 8th rows: Work to the last 28 stitches, turn
9th row: Work to the end of the row
Cast off
The Sleeves
Using the “Fuzzy Wuzzy” and No 6 Needles, cast on 81 stitches
Work 18 rows in Moss Pattern, decreasing once in the last row (80 stitches)
Join in the “Silversheen,” and work in pattern until 5 patterns have been completed from the commencement
Using the No 7 Needles, work 4 patterns
Using the No 8 Needles, work 1 pattern
Continue to work in pattern, casting off 2 stitches at the beginning of every row until 32 stitches remain. Cast off
The Collar
Using the “Fuzzy Wuzzy” and No 6 Needles, cast on 3 stitches
Work in Moss Pattern, increasing once at the end of every alternate row, until there are 21 stitches on the needle
Continue without shaping until the work measures 40 inches from the commencement
Decrease once at the beginning of every alternate row on the same side that the increasing was worked until 3 stitches remain, slip 1, K2tog, psso. Fasten off
The Cord
Using the “Fuzzy Wuzzy” and the Crochet Hook, make 5 chain, join into a ring with a slip stitch
Work 14 double crochet (US single crochet) into the ring
Continue working round in double crochet, (US single crochet) taking up the back loop only, until the cord is the length required
Break off wool and thread with wool needle, gather up the 14 stitches, and fasten off
To Make Up the Gown
With a damp cloth and hot iron, press carefully
Sew up the side, shoulder and sleeve seams
Sew in the sleeves, placing seam to seam
Sew the collar in position, easing it a little round the back of the neck
Make a length of crochet chain and attach to the side seams through which to thread the cord
Work 1 row of double crochet (US single crochet) evenly round, the bottom of the gown
Make up the lining and sew in position
Make two strips of silk for a tie, fasten one to the right armhole and the other to the point on the left front
Sew press stud at the end of the collar on the right front
This pattern has passed into the public domain. Digital version of this pattern Copyright © Sarah Bradberry June 1999. All rights reserved.