
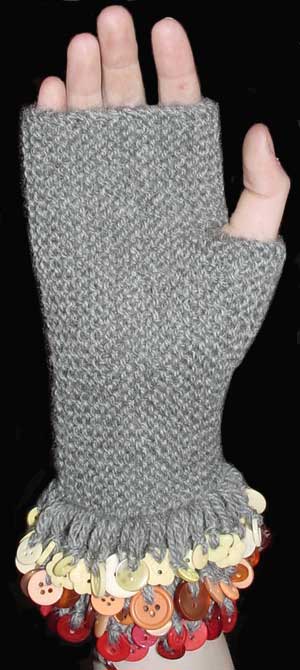
These mitts are knit flat with simple shortrows used to form the thumb gusset, then stitches are picked up along one side to work the fringe. Attach your choice of buttons or charms for a one-of-a-kind look!
Size
Lady’s medium: hand circumference 18.5 – 19.5cm
For a wider pair of mitts work additional rows before and after working the thumb gusset.
Materials
Yarn: 100gms (Approximately 200m or 220 yards) 8 ply wool.
Needles: 4mm and 3.25mm straight needles (or circulars if you prefer those for flat knitting). 1 tiny crochet hook or needle threader for threading the loops through your buttons.
Misc: 204 buttons or plastic charms. I used 68 each of red, orange and yellow buttons.
Tension
22sts to 10cm over garter st on 4mm needles.
Abbreviations
k = knit
tbl = through the back of the loop
W&T = Wrap and Turn:
Knit to the point where the pattern says to W&T
Bring your yarn to the front of the work, Sl the next st from the left hand needle purlways, take your yarn to the back of the work, Sl the st back to the left hand needle, making sure not to twist it. Turn your work.
The next time you knit the wrapped st, knit the wrapped yarn along with the stitch it is wrapped around. This prevents the appearance of any holes in your work.
WS= Wrong side (this will be inside your mitt when you’re finished).
RS = Right side. (This is the side of the knitting that shows when your mitt is finished).
Pattern
(Make 2)
Using 4mm needles, cast on 35sts.
1st row (WS): Knit
Knit another 33 rows.
Shape thumb gusset:
Next row: K23, turn (do not wrap)
K3, W&T
K3
K6, W&T
K6
K9, W&T
K9
K12, W&T
K12
K14, W&T
K14
K12, W&T
K12
K9, W&T
K9
K6, W&T
K6
K3, W&T
K3
Turn
Knit to the end of the row
Knit 34 rows across all stitches. Cast off.
Fringe:
With RS facing, and using 3.25mm needles, pick up and knit 36sts along the bottom edge of your mitt.
1st row (WS): K1, *place the 1st and 2nd fingers of your left hand behind the back of your work and knit the next stitch, winding the yarn around both fingers. Don’t slip the stitch off the left hand needle. Place the stitch just made onto the left hand needle and knit both together through the back of the loops. **
Repeat from * to ** until you reach the last stitch, k1.
2nd row: (K1tbl, p1tbl) repeat to last 2sts, k2tbl
3rd-6th rows: (K1, p1), repeat to the last 2sts, k2.
Repeat rows 1-6 twice more and cast off loosely in rib.
Tip: For plain mitts, omit rows 1 and 2 and work rows 3 to 6 only until the cuff measures 5cm in length, then cast off.
To make up
Using a neat mattress, or back stitch, sew the cast on and cast off edges of the body and the ends of the fringed section together.
Now comes the fun part, adding your buttons!
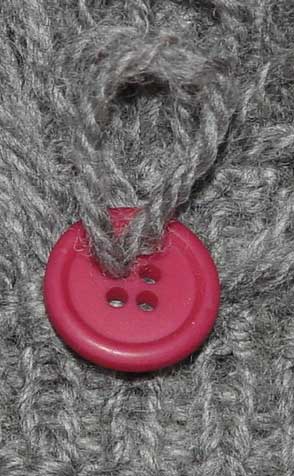
1: With the back of your button facing you thread one of the loops of your fringe through one of the holes. (Note that the photograph on the left shows the front of the button facing, but you want to have the back of the button facing you).
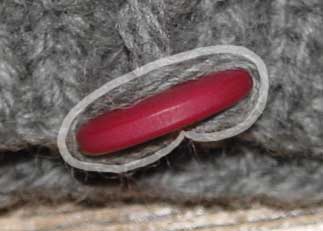
2: Fold the loop over the top of your button and slide the sides of the loop all the way down the sides of the button until they meet.
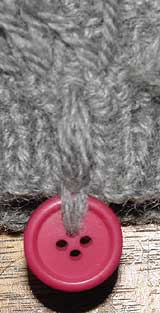
3: Pull on the button gently to tighten the loop. Repeat for all the other loops on the fringe.
Copyright Sarah Bradberry. All rights reserved.